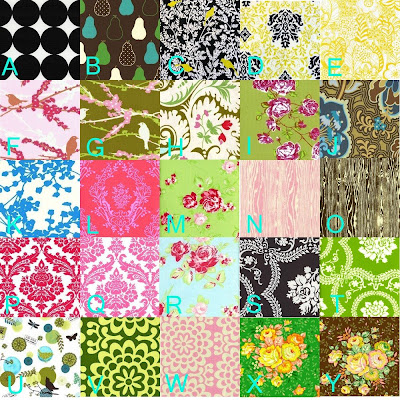
photoshop power that is.... I love learning how to do anything on this powerful tool, and I have expanded my very limited knowledge just a little more tonight. My daughter showed me how to put a lot of pictures onto one document - don't know if this has a special term or not... Anyway, I've been adding a 4th or 5th picture to my clothing listings for a long time, to show customers what other prints and colors they can get things made in, but I wanted to show more.
I already knew how to add text, so it was pretty easy to do. I may need to tweak it a bit more, because I like how it looks like a beautiful quilt, but the two dark prints in the upper left corner seem unbalanced with the rest of it. It's kind of like a mosaic on flickr; it shows you what colors you really like by having so many repeated in that palette. Apparently I love greens and pinks (no surprise there). Grass green has been fascinating me as of late- I got the cutest terry cloth summer dress in this color and I can't wait to wear it. My plan is to wear pretty things this summer whether I weigh what I want to or not. so there!
So, if you want to make one of these pretty quilt grids of your own, and you have some sort of program that will let you do it, here's my simple (hopefully) explanation:
1} save pictures of fabrics you like~
2} in photoshop, FILE -> NEW -> choose the pixel size you want - I chose 1000 x 1000 so it wouldn't be too big, press OK --this is your NEW, UNTITLED DOCUMENT
3} in photoshop, FILE -> OPEN -> choose the one you want to start with and select it
4} you'll need to change the image size of your photo most likely, I changed mine to 200 x 200 so that I could fit five pics across each row, and five pics top to bottom (( if you wanted to do bigger pictures, just make the pixel size fit into the 1000 equally, like 250 x 250 if you want to end up with 20 photos total))
5} select the rectangle marquee tool ( top left, dotted lines square shape), then use it to drag across the photo you just resized from the top left corner to the bottom right.
6} under EDIT, click COPY
7} I then click on the MOVE tool (right next to the dotted line square you just used) and put the cursor on the new untitled document you created at the beginning..... then click EDIT - PASTE and your little image should now be on the blank document. You can move it around where you want it.
8} FILE, OPEN - choose next picture, repeat above process. Continue until all pictures are on blank document.
9} Use text tool to add alphabet letters on each picture
10} SAVE AS.... name your file - I've noticed it won't upload to etsy unless I save it as a jpeg, although I know I've uploaded png's in the past. It kept saying the file size was too big until I saved it again as a jpeg.
I don't argue with it or rip my hair out wondering why, I just keep clicking stuff until it does what I want. If all else fails, I call my teenager and she fixes it :)
But seriously, this was really easy! Maybe you all already knew this, but I thought maybe it would help some technologically challenged soul like me.
ta ta!

1 comment:
it must be good having a tech savvy teen about... well you taught me something too! I have so much to learn in photoshop, I go through spurts. I love the look of that grid, very pro. thanks for posting the info on how you got there.
Post a Comment